iOS 开发实践:位置权限、推送通知与扩展开发
December 19, 2024 (1y ago)
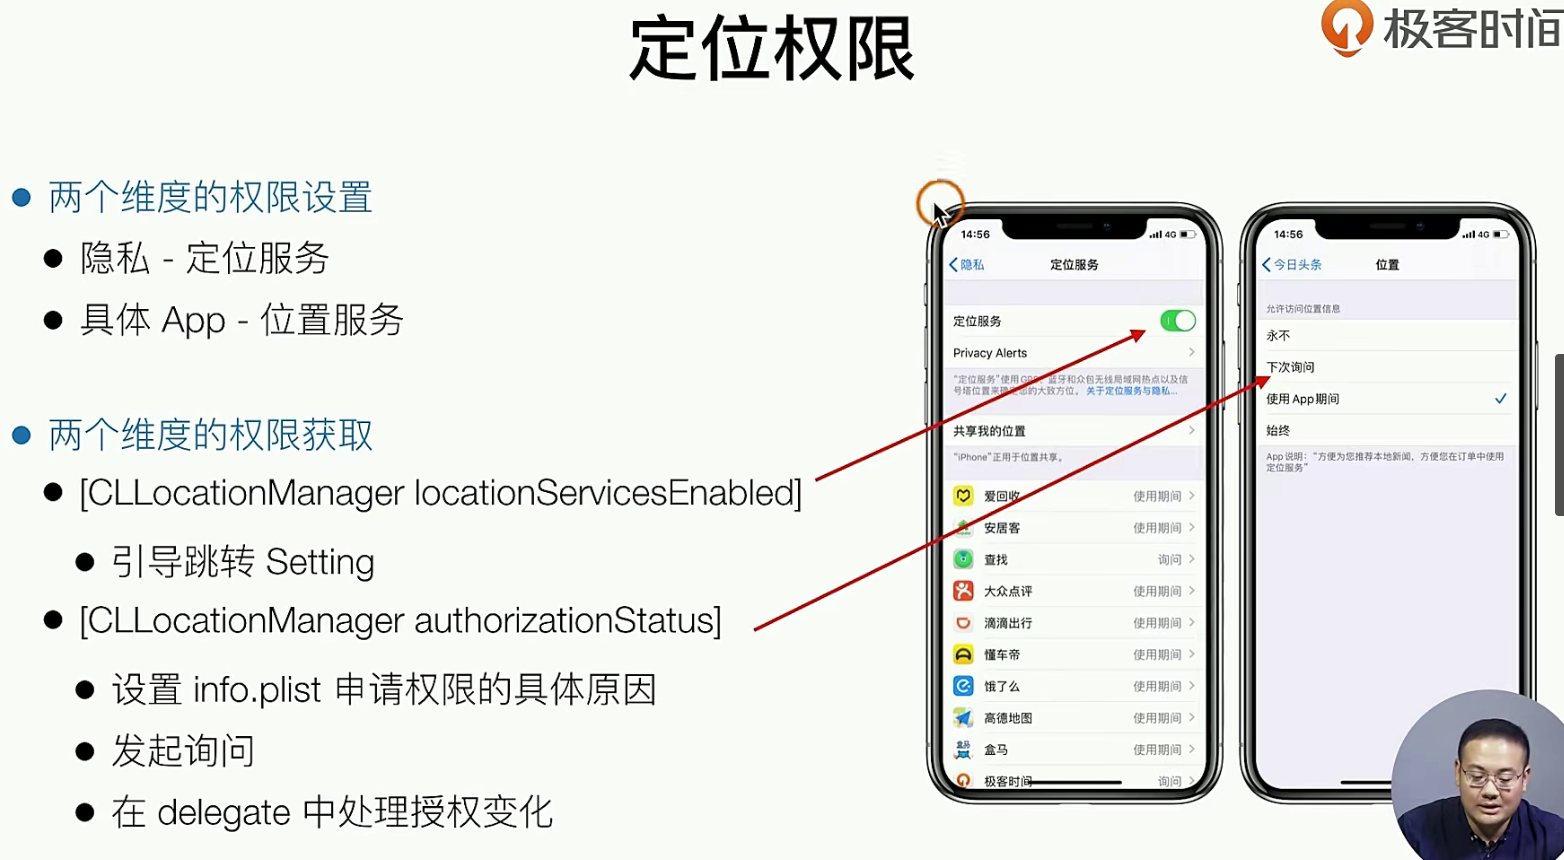
关于位置权限的获取
理论知识
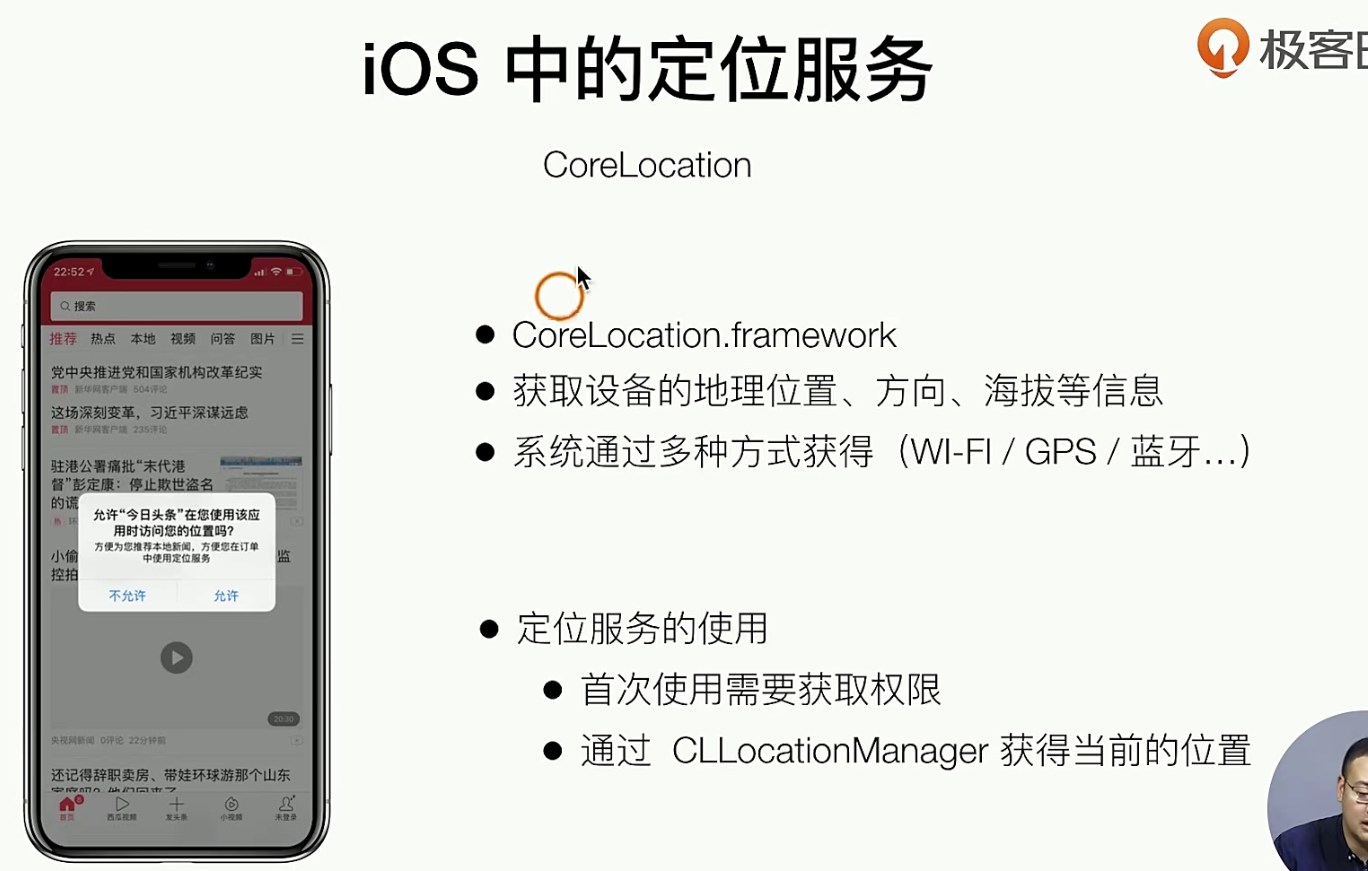
对于定位权限,有总的 和 app内部的,app内部还回有细分很多的权限,使用App期间,仅此一次,始终
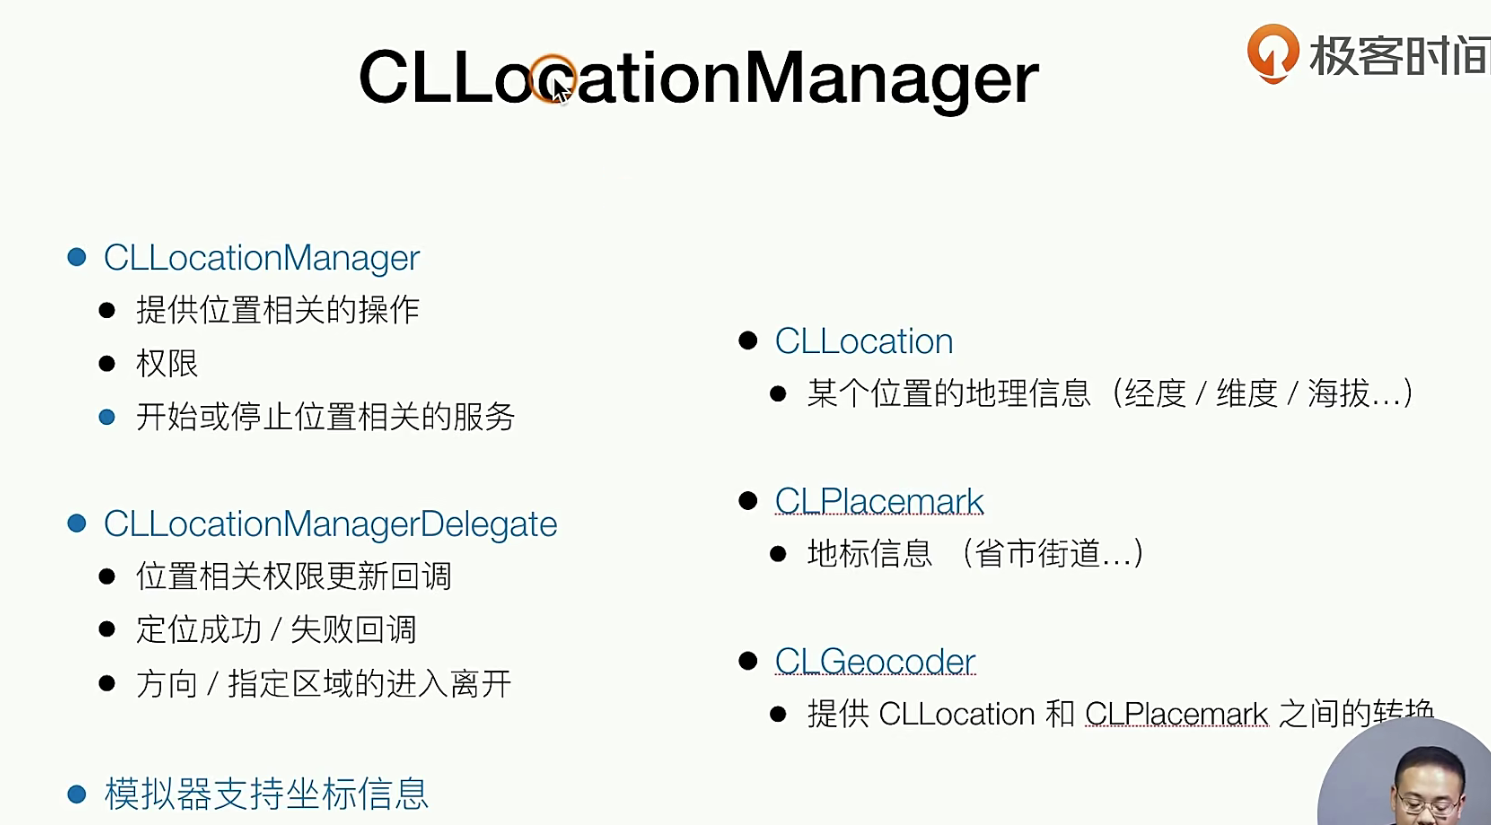
上面的CLLoactionManager 是 位置回调 的delegate
代码实践
我们的定位权限,实际上 它可以是一个单利,因为和某个页面没有关系,素全局统一的管理的,注意如果要用loactoiin,那么你需要使用 系统提供的Framwork
对于我们开发来说,权限有下面几种情况 1. 系统的权限没有开启, 2.App内 权限未知 3.App内 具体的权限(始终,使用期,仅此一次),具体的权限的提示文案是在info.plist
# h
//
// GTLocation.h
// SampleApp
//
// Created by dequanzhu on 2019.
// Copyright © 2019 dequanzhu. All rights reserved.
//
#import <Foundation/Foundation.h>
NS_ASSUME_NONNULL_BEGIN
/**
App中统一的位置信息管理
*/
@interface GTLocation : NSObject
+ (GTLocation *)locationManager;
- (void)checkLocationAuthorization;
@end
NS_ASSUME_NONNULL_END
# m
//
// GTLocation.m
// SampleApp
//
// Created by dequanzhu on 2019.
// Copyright © 2019 dequanzhu. All rights reserved.
//
#import "GTLocation.h"
#import <CoreLocation/CoreLocation.h>
@interface GTLocation()<CLLocationManagerDelegate>
@property(nonatomic, strong, readwrite) CLLocationManager *manager;
@end
@implementation GTLocation
+ (GTLocation *)locationManager{
static GTLocation *location;
static dispatch_once_t onceToken;
dispatch_once(&onceToken, ^{
location = [[GTLocation alloc] init];
});
return location;
}
- (instancetype)init{
self = [super init];
if (self) {
self.manager = [[CLLocationManager alloc] init];
self.manager.delegate = self;
}
return self;
}
- (void)checkLocationAuthorization{
//判断系统是否开启
if(![CLLocationManager locationServicesEnabled]){
//引导弹窗
//
}
if([CLLocationManager authorizationStatus] == kCLAuthorizationStatusNotDetermined){
[self.manager requestWhenInUseAuthorization];
}
}
#pragma mark - delegate
- (void)locationManager:(CLLocationManager *)manager didChangeAuthorizationStatus:(CLAuthorizationStatus)status{
if (status == kCLAuthorizationStatusAuthorizedWhenInUse) {
//
[self.manager startUpdatingLocation];
}else if (status == kCLAuthorizationStatusDenied){
//
}
}
- (void)locationManager:(CLLocationManager *)manager
didUpdateLocations:(NSArray<CLLocation *> *)locations {
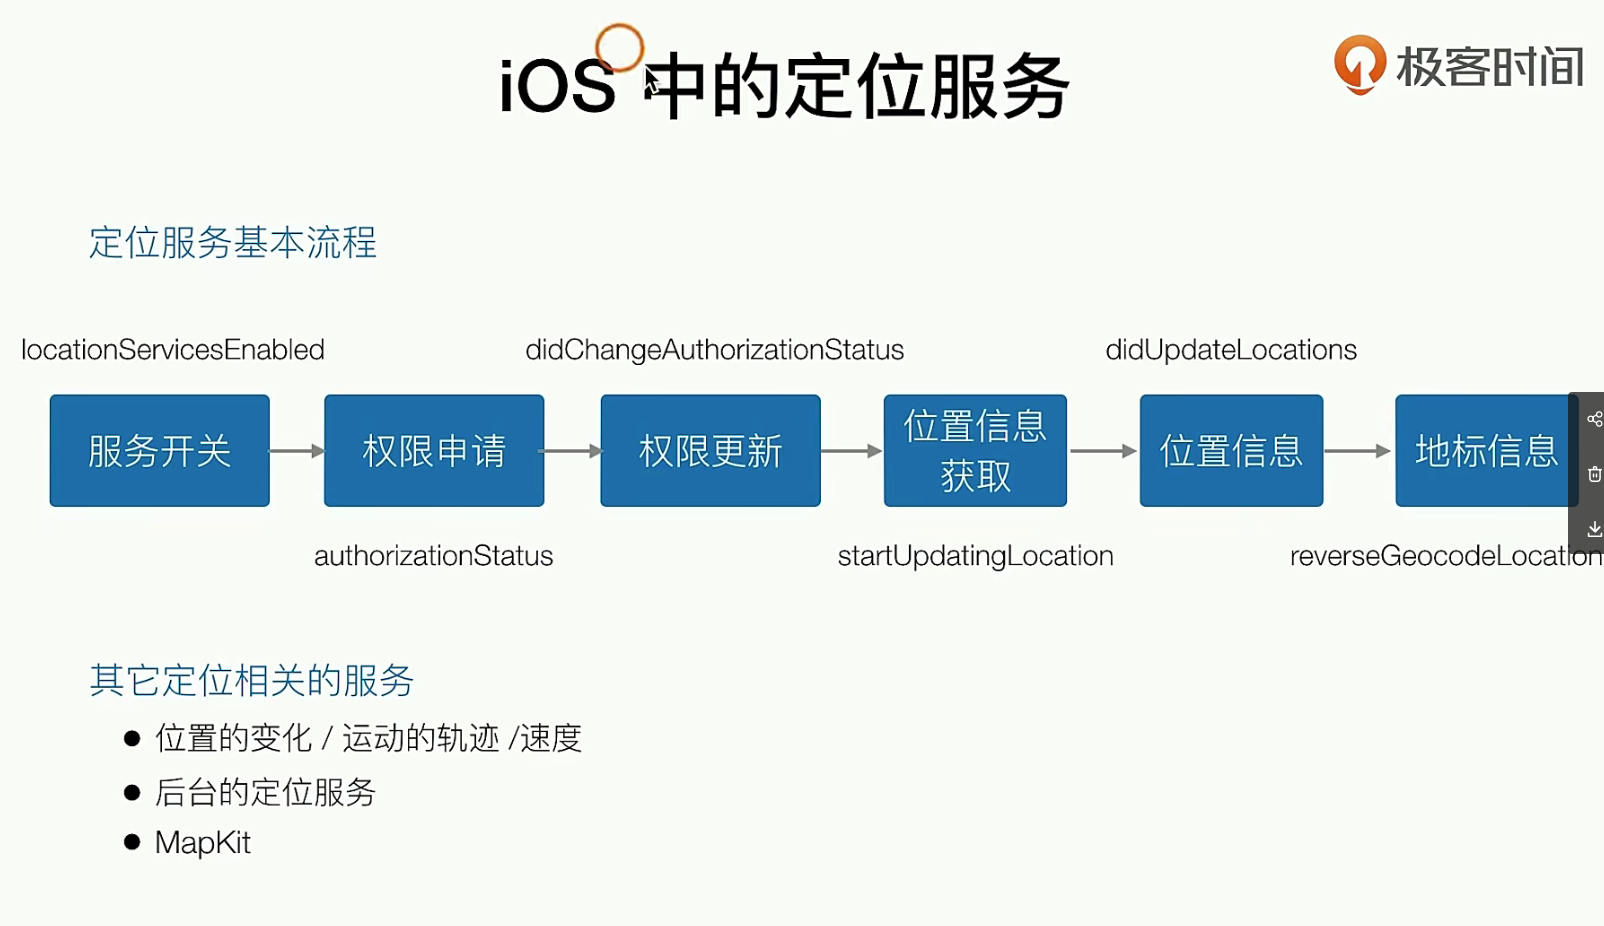
// 这个回调 返回的的是经纬度,经纬度可以由系统提供的另一个方法来 进行各种转换 通过这个Deletage
//地理信息
CLLocation *location = [locations firstObject];
CLGeocoder *coder = [[CLGeocoder alloc] init];
[coder reverseGeocodeLocation:location completionHandler:^(NSArray<CLPlacemark *> * _Nullable placemarks, NSError * _Nullable error) {
//地标信息
}];
// 建议不要一直 开启 都在获取 用户位置
[self.manager stopUpdatingLocation];
}
@end
## 使用的时候也非常的简单
//
// AppDelegate.m
// SampleApp
//
// Created by dequanzhu on 2019.
// Copyright © 2019 dequanzhu. All rights reserved.
//
#import "AppDelegate.h"
#import "GTNewsViewController.h"
#import "GTVideoViewController.h"
#import "GTRecommendViewController.h"
#import "GTSplashView.h"
#import "GTStaicTest.h"
#include <execinfo.h>
#import "GTLocation.h"
#import "GTNotification.h"
#import "GTMineViewController.h"
#import <TencentOpenAPI/TencentOAuth.h>
@interface AppDelegate ()<UITabBarControllerDelegate>
@end
@implementation AppDelegate
- (BOOL)application:(UIApplication *)application didFinishLaunchingWithOptions:(NSDictionary *)launchOptions {
++++++
//定位和push
[[GTLocation locationManager] checkLocationAuthorization];
[[GTNotification notificationManager] checkNotificationAuthorization];
// 有关于info.plist
+++
	<key>NSLocationWhenInUseUsageDescription</key>
	<string>需要您的位置信息推荐地方新闻</string>
+++
所以我们来总结一下哈:
关于IOS的推送
理论知识
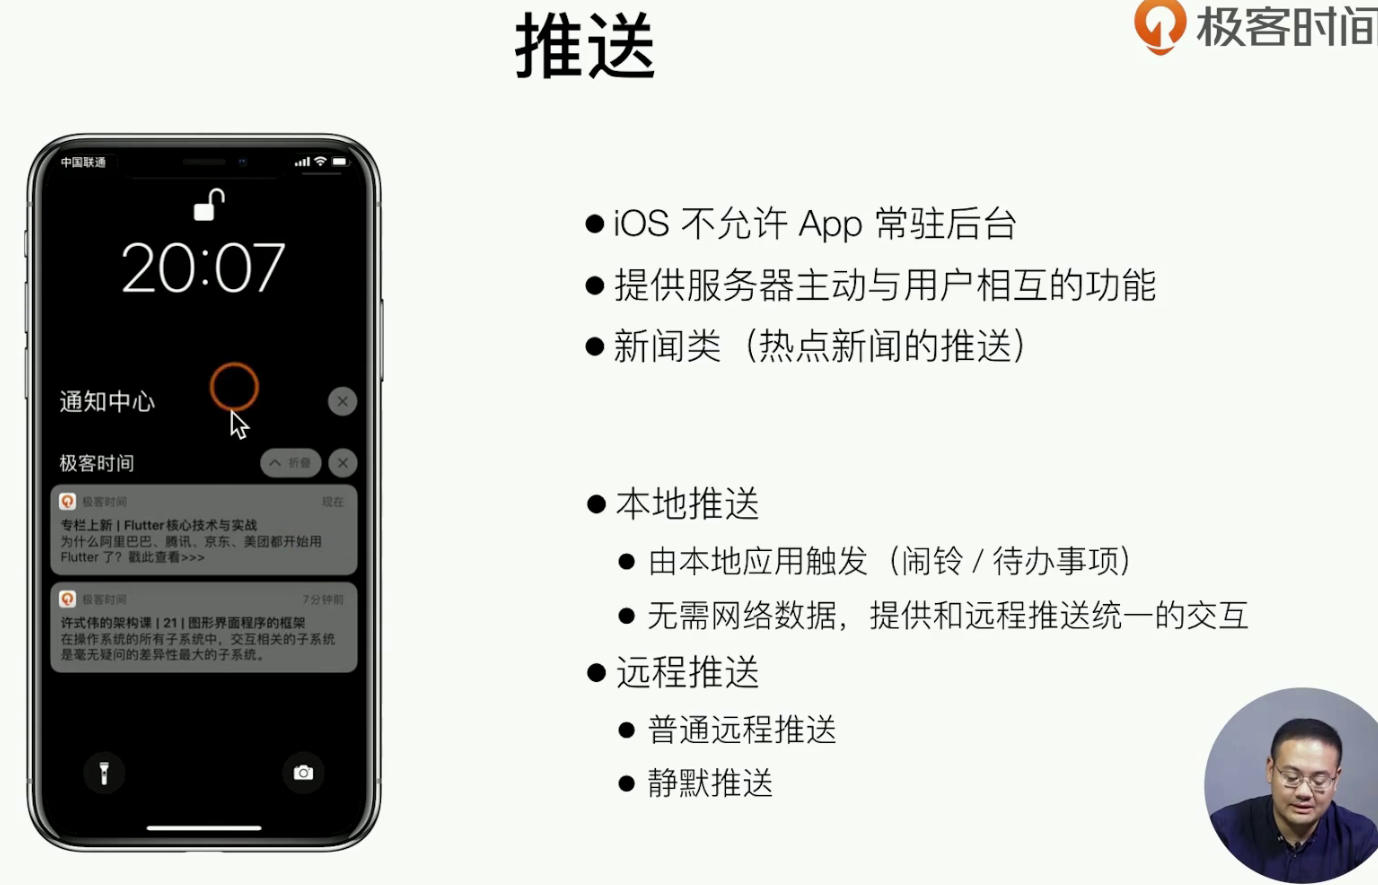
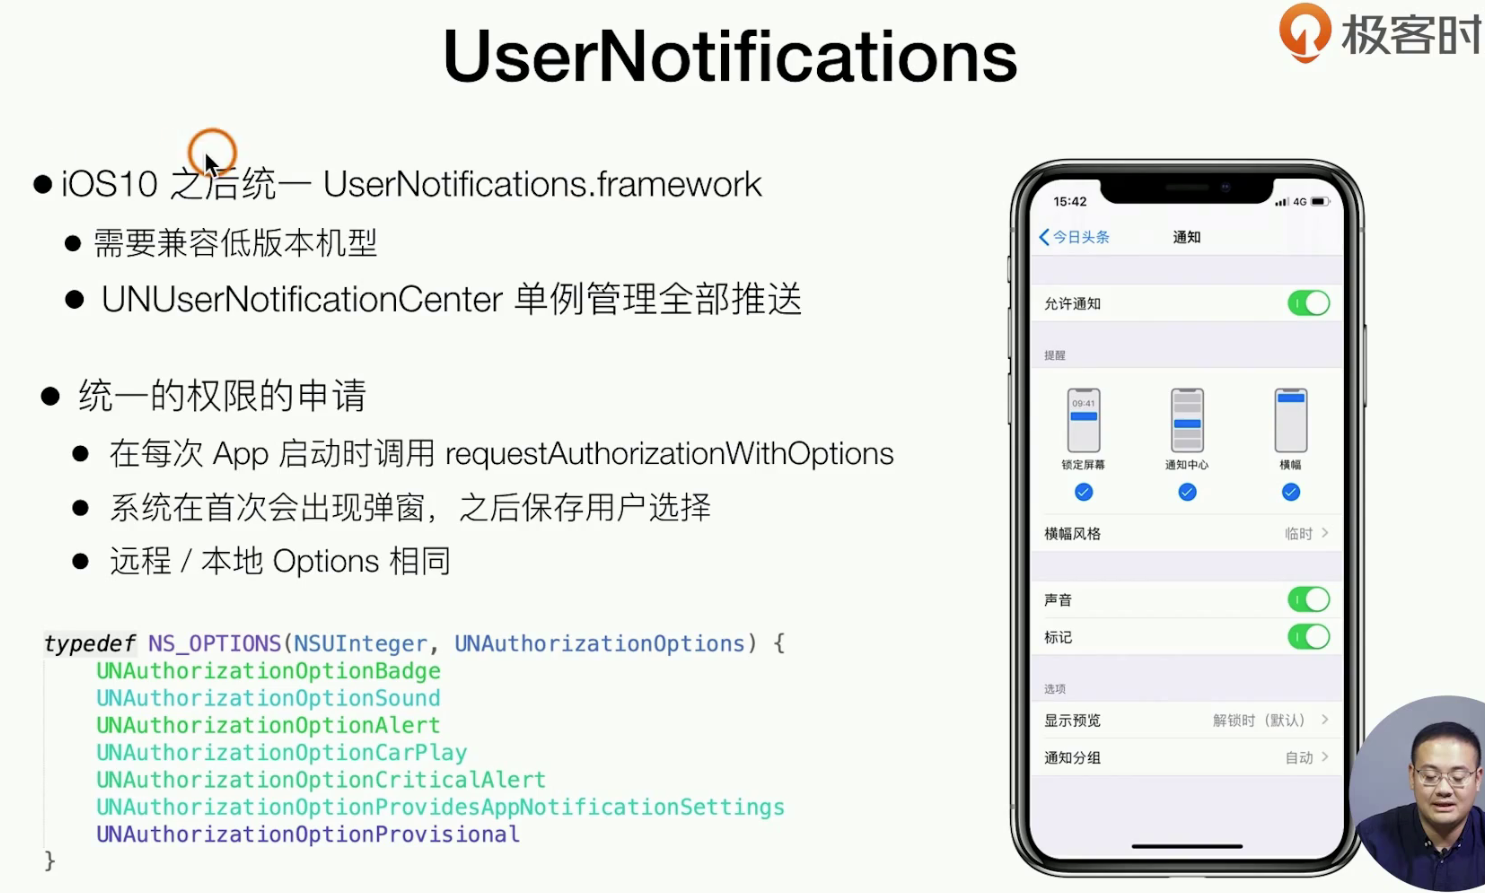
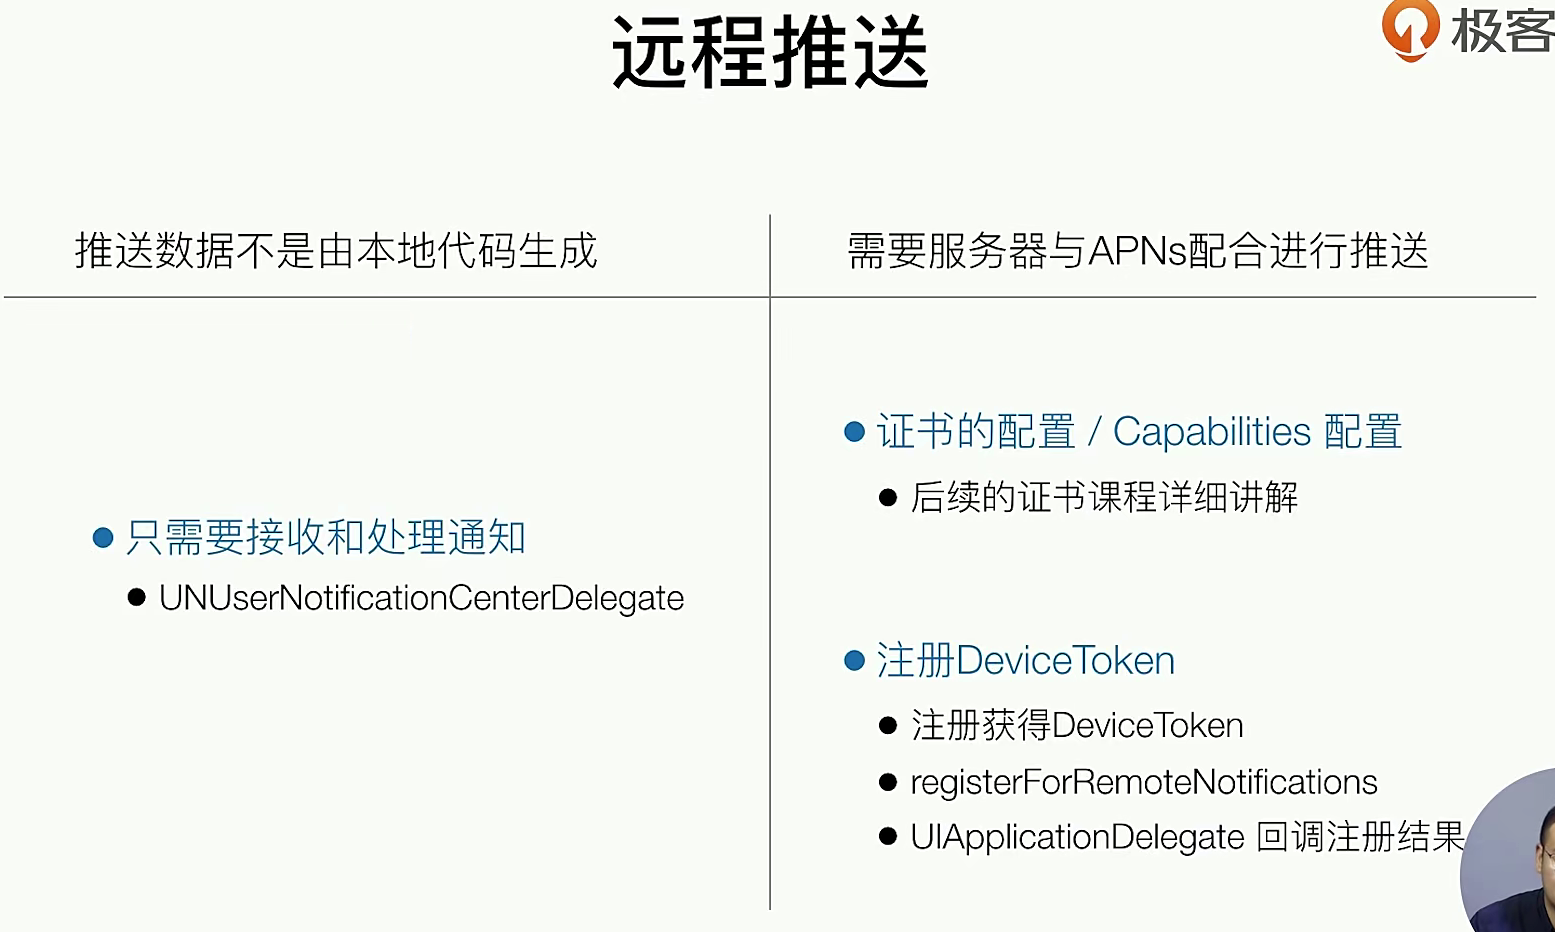
注意 这个是对于ios9高版本 来用的,如果是一些低版本就不管了,获取权限就说上面的几个基本的步骤,如何操作数据是下面接着要说的
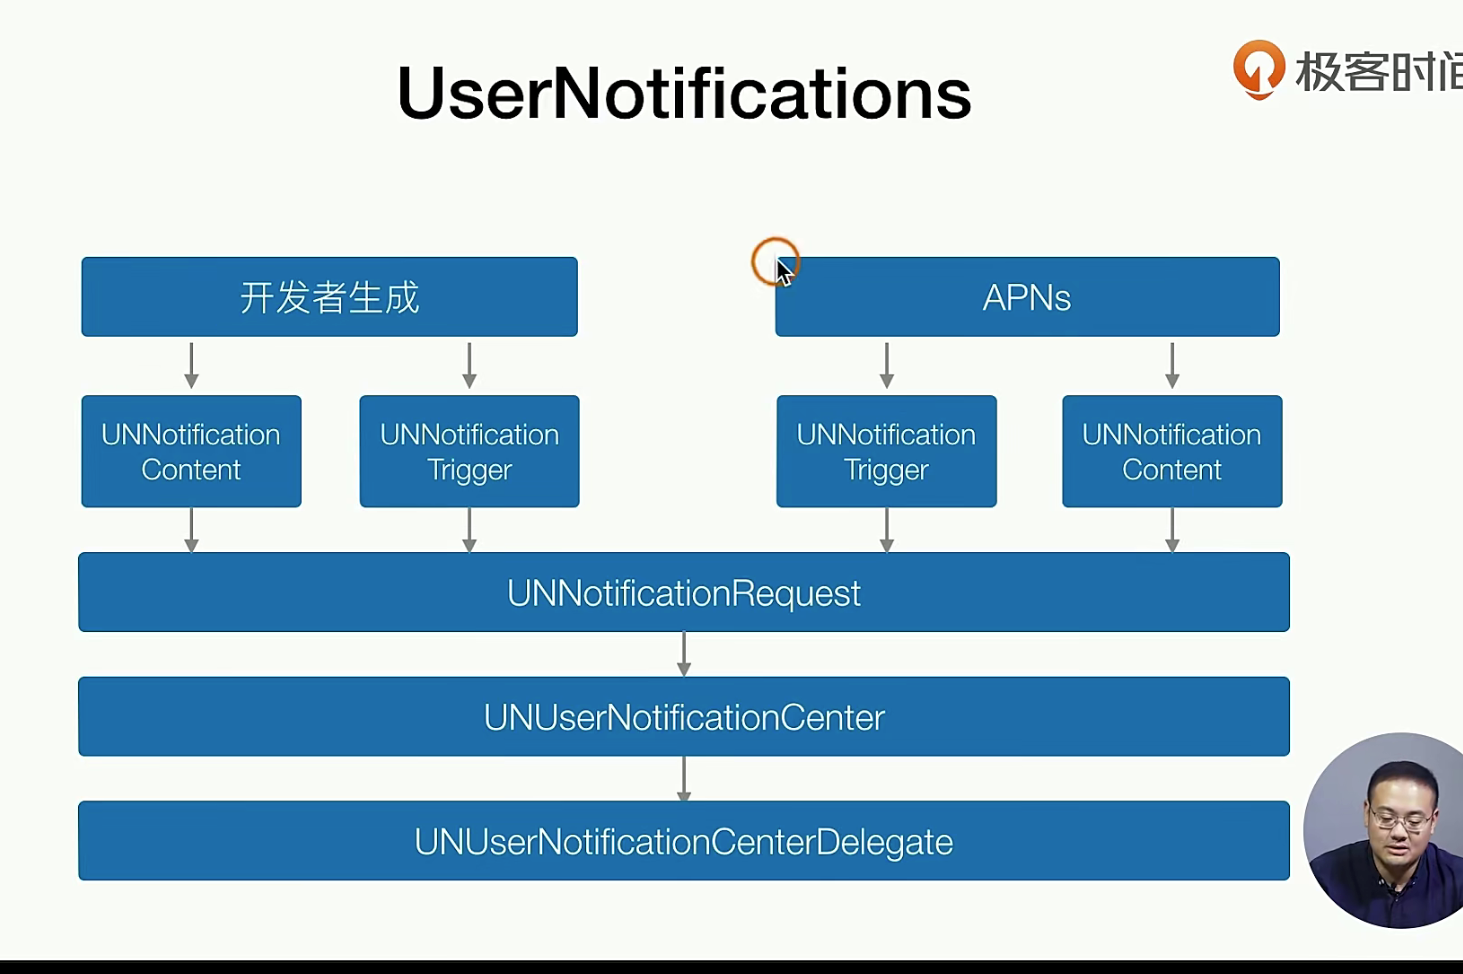
content是内容,tigger是推送的时机 ,最后到我们开发者手中,都是要接着封装封装的
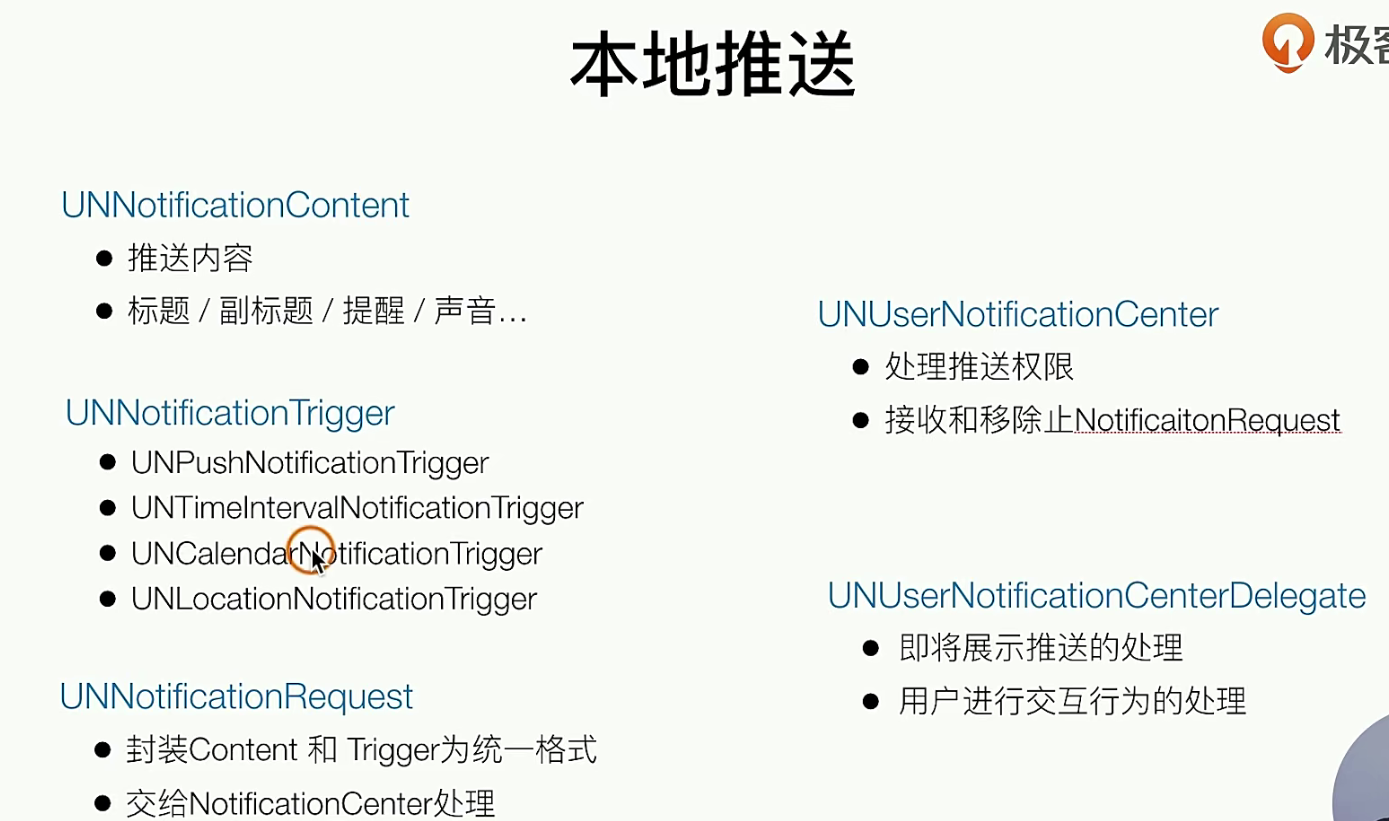
大概的流程就聚合如下面流程 Content -> Trigger -> Req -> Center _ ____> Delegate
关于远程的推送的实现,主要是解决 进程杀掉还继续推送通知,实际上是一个长连接,APNs是IOS的一个服务,所有的推送操作 都要去对接Apns ,APNS是IOS中唯一的一个推送长连接,一个PUSH通道,再由它 推送到设备 和 App
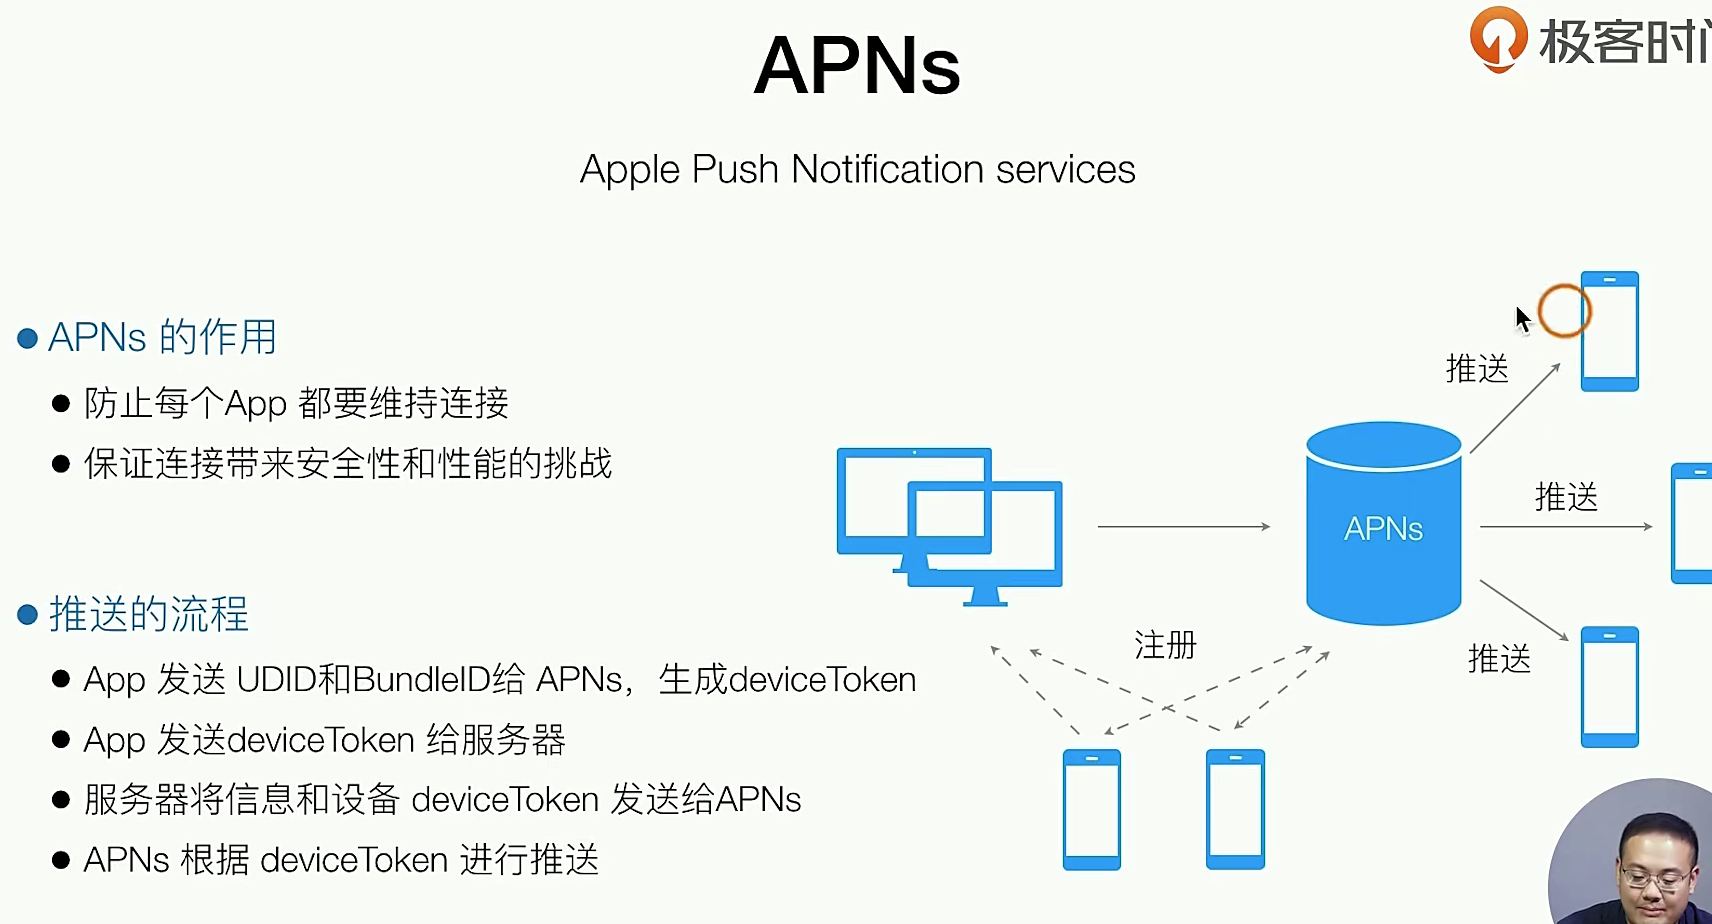
具体我们要做的:配置UUID(需要Capabilities 证书) ,配置后台数据 ,接受广播
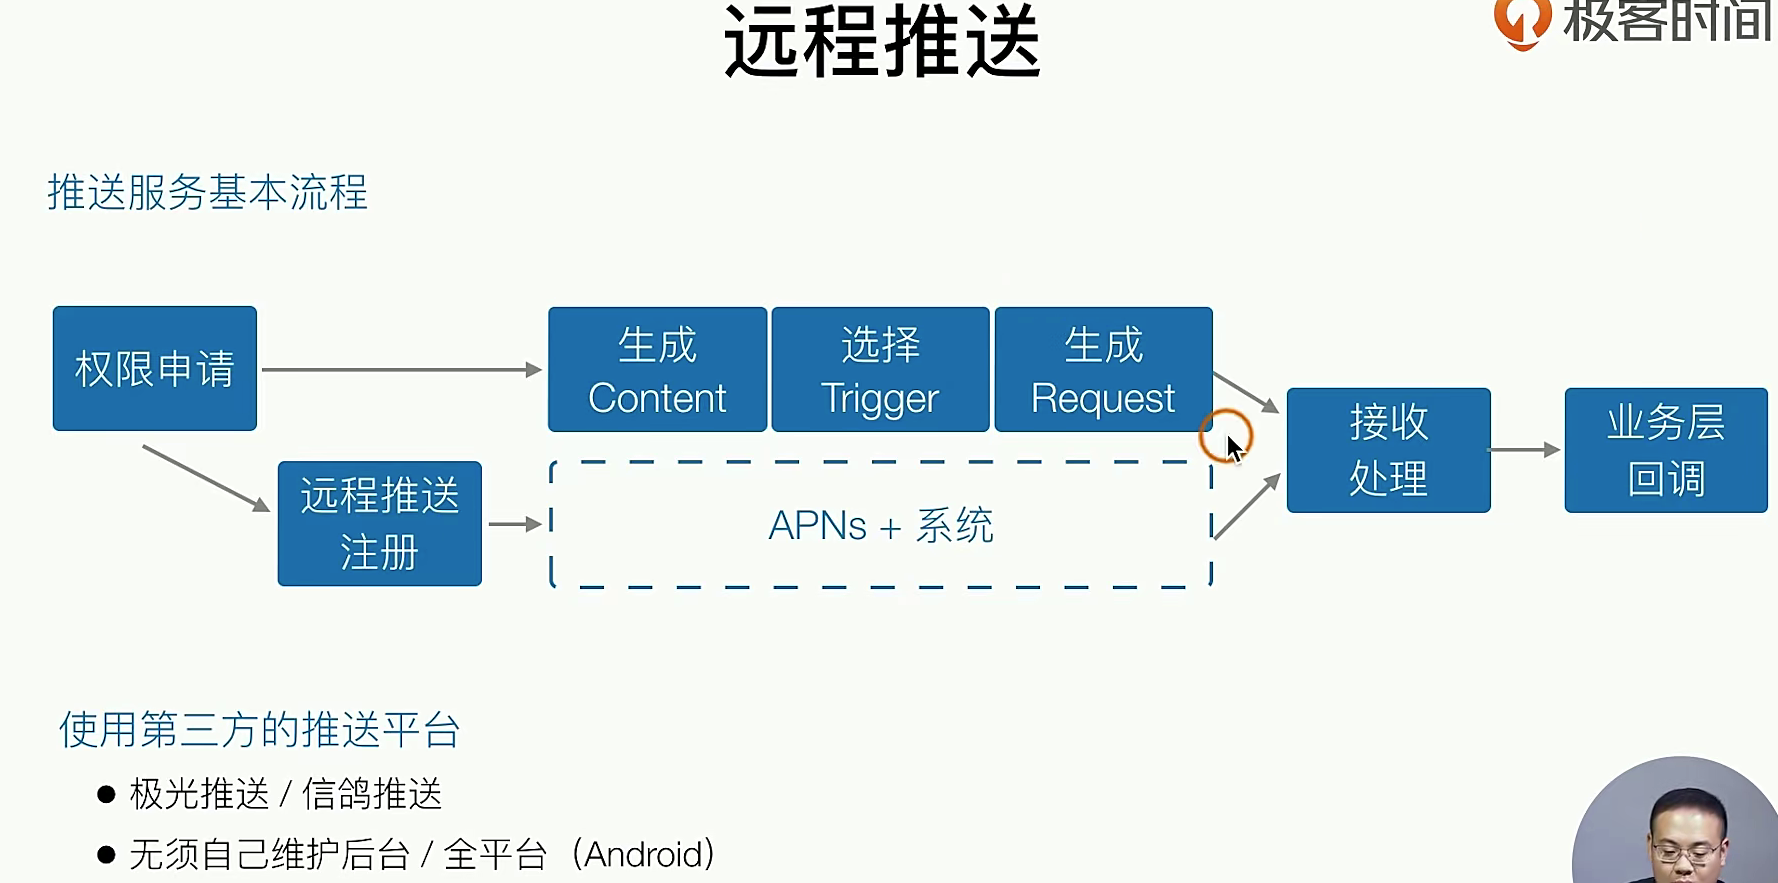
我们也有一些推送的SDK 可以使用,就目前体验和代稳定性来说腾讯的XG ,质量比较好 ,但是也比较贵,这些第三方的还是非常简单的。
代码实现
和loaction一样这个东西也是如此,我们依然使用单例来实现,也同样需要看看全局的权限有没有开,再看看App内的权限有没有开
## h文件
#import <Foundation/Foundation.h>
NS_ASSUME_NONNULL_BEGIN
/**
APP 推送管理
*/
@interface GTNotification : NSObject
+ (GTNotification *)notificationManager;
- (void)checkNotificationAuthorization;
@end
NS_ASSUME_NONNULL_END
## m文件
#import "GTNotification.h"
// 桌注意啊,我们也要使用 系统提供的库 来实现,info.pliist也是需要配置了,这里就不多详细的说了
#import <UserNotifications/UserNotifications.h>
#import <UIKit/UIKit.h>
@interface GTNotification ()<UNUserNotificationCenterDelegate> // 实现这个Delegate
@end
@implementation GTNotification
+ (GTNotification *)notificationManager{
static GTNotification *manager;
static dispatch_once_t onceToken;
dispatch_once(&onceToken, ^{
manager = [[GTNotification alloc] init];
});
return manager;
}
- (void)checkNotificationAuthorization{
UNUserNotificationCenter *center = [UNUserNotificationCenter currentNotificationCenter];
center.delegate = self;
// UNAuthorizationOptionBadge 又上角的红点,和声音UNAuthorizationOptionSound
[center requestAuthorizationWithOptions:UNAuthorizationOptionBadge | UNAuthorizationOptionSound completionHandler:^(BOOL granted, NSError * _Nullable error) {
if (granted) {
//本地推送 (有权限的时候先触发一次本地推送PUSH)
[self _pushLocalNotification];
//远程推送 (如何触发一次 远程推送 )远程的PUSH,第一步要更IOS的APNs 获取token
dispatch_async(dispatch_get_main_queue(), ^{ // 这个代码需要在主线程上跑
[[UIApplication sharedApplication] registerForRemoteNotifications];
});
// 然后使用delegaet 来进行回调逻辑触发
}
}];
}
#pragma mark -
- (void)_pushLocalNotification{
UNMutableNotificationContent *content = [[UNMutableNotificationContent alloc] init];
content.badge = @(1);
content.title = @"极客时间";
content.body = @"从0开发一款iOS App";
content.sound = [UNNotificationSound defaultSound];
// 这里都是在生产-> Centent
// 生产时机 时间间隔 30.f (30s)
UNTimeIntervalNotificationTrigger *trigger = [UNTimeIntervalNotificationTrigger triggerWithTimeInterval:30.f repeats:NO];
// Req
UNNotificationRequest *request = [UNNotificationRequest requestWithIdentifier:@"_pushLocalNotification" content:content trigger:trigger];
// Center
[[UNUserNotificationCenter currentNotificationCenter] addNotificationRequest:request withCompletionHandler:^(NSError * _Nullable error) {
//
}];
}
#pragma mark -
- (void)userNotificationCenter:(UNUserNotificationCenter *)center willPresentNotification:(UNNotification *)notification withCompletionHandler:(void (^)(UNNotificationPresentationOptions options))completionHandler{
completionHandler(UNNotificationPresentationOptionAlert);
}
- (void)userNotificationCenter:(UNUserNotificationCenter *)center didReceiveNotificationResponse:(UNNotificationResponse *)response withCompletionHandler:(void(^)(void))completionHandler {
//处理badge展示逻辑
//点击之后根据业务逻辑处理
//[UIApplication sharedApplication].applicationIconBadgeNumber = 100;
//处理业务逻辑 这个就是点击通知的时候 要进行的业务逻辑,比如打开xxx底层页面上面的
completionHandler();
}
@end
## 我们再来看看 再AppDelegaet.m 的时候也是需要的 和 Loactioin定位权限是一样的用法 和逻辑
++++
#pragma mark - PUSH
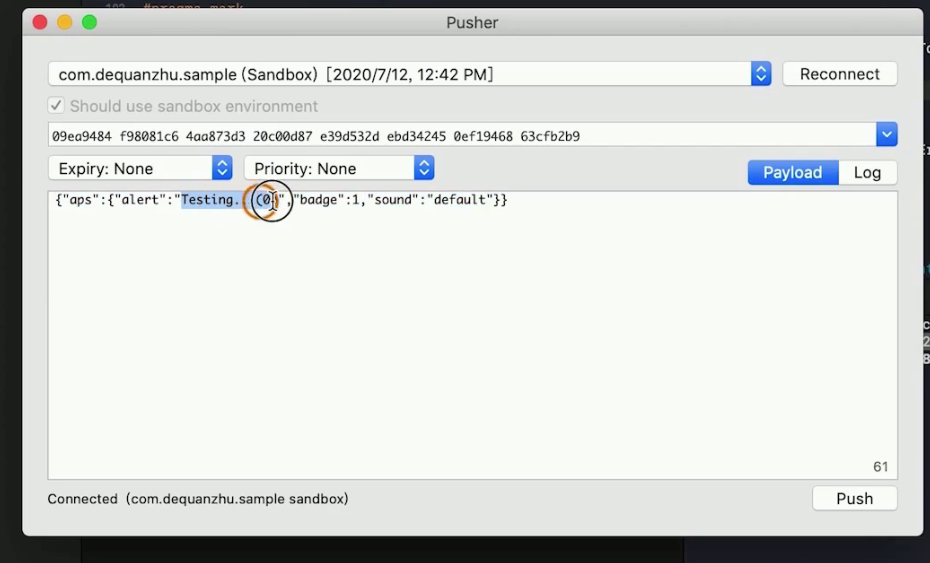
- (void)application:(UIApplication *)application didRegisterForRemoteNotificationsWithDeviceToken:(NSData *)deviceToken{
//尽量收敛到GTNotification中实现
//注册成功 拿到了deviceToken 发给你的服务,你的服务器 进行消息推送就好了 ,有一个小工具 可以
// 拿来当做服务器,Pusher
}
- (void)application:(UIApplication *)application didFailToRegisterForRemoteNotificationsWithError:(NSError *)error {
//注册失败
}
实际上来说,我们还是建议公司自研 ,毕竟控制权在我们自己的手上
APP图标的问题
理论知识
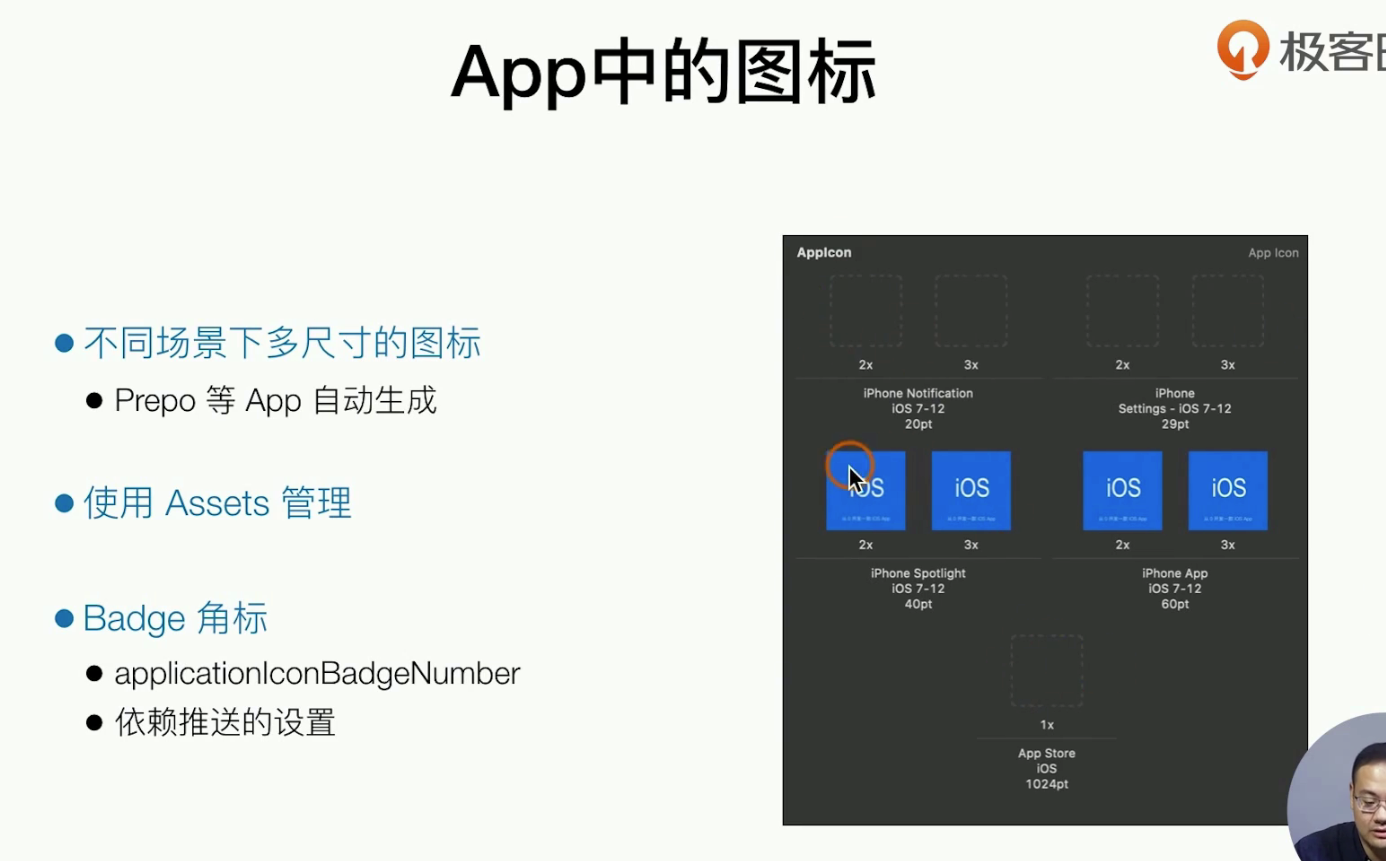
有一些工具 🔧可以一键生成IOSApp的图标,比如Perpo ,我们只需要把生产的图片 丢到Asset中的AppIcon中就好了,Notification 的ICON也是可以更改的,图标数字Brgith 如何做定制化呢?如何+-1操作呢?主要是说系统提供的一个宏
- (void)userNotificationCenter:(UNUserNotificationCenter *)center didReceiveNotificationResponse:(UNNotificationResponse *)response withCompletionHandler:(void(^)(void))completionHandler {

    //处理badge展示逻辑
    //点击之后根据业务逻辑处理
    //[UIApplication sharedApplication].applicationIconBadgeNumber = 100;

    //处理业务逻辑  这个就是点击通知的时候 要进行的业务逻辑,比如打开xxx底层页面上面的
    completionHandler();
}
在IOS10.3 + 之后,IOS的App能动态的更改图标 ,但是回弹出一个窗口(网上有非常鸡贼的教程)
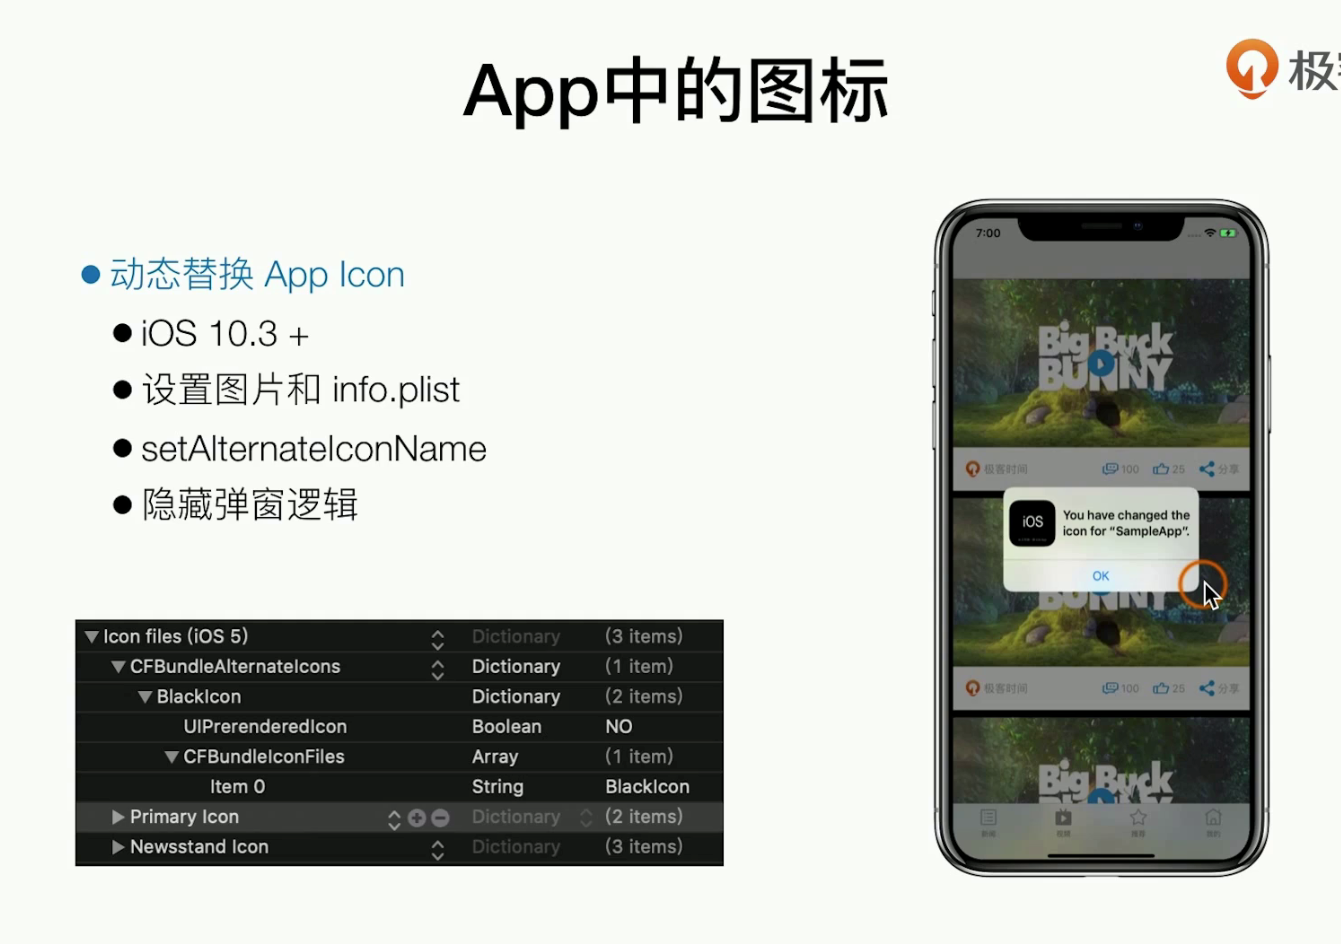
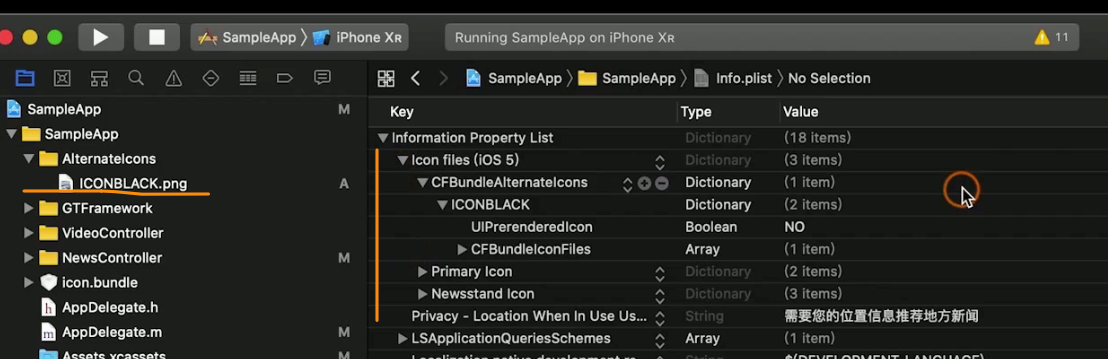
主要是把要更改的图片 换在Build中,使用info.list 去管理,再用一个函数 去手动的替换图标
++++
- (void)tabBarController:(UITabBarController *)tabBarController didSelectViewController:(UIViewController *)viewController{
    NSLog(@"did select");

    //测试更换图标
    //[self _changeIcon];
}
++++
- (void)_changeIcon{
    //动态更换图标
    if ([UIApplication sharedApplication].supportsAlternateIcons) {
        [[UIApplication sharedApplication] setAlternateIconName:@"ICONBLACK" completionHandler:^(NSError * _Nullable error) {
            //回调
        }];
    }
}
Applicatoon Extension
这个是什么东西? 我们之前的开发App都是在App中调用系统的Api来操作哦,现在我们看看App如何提供 功能给系统,经典的场景 就是自定义分享,自定义键盘,-1 屏通知操作,Share 等....
基础知识

注意!⚠️ Extesnion 和App运行时无关,App的作为独立二进制 来运行的!Extension时独立的
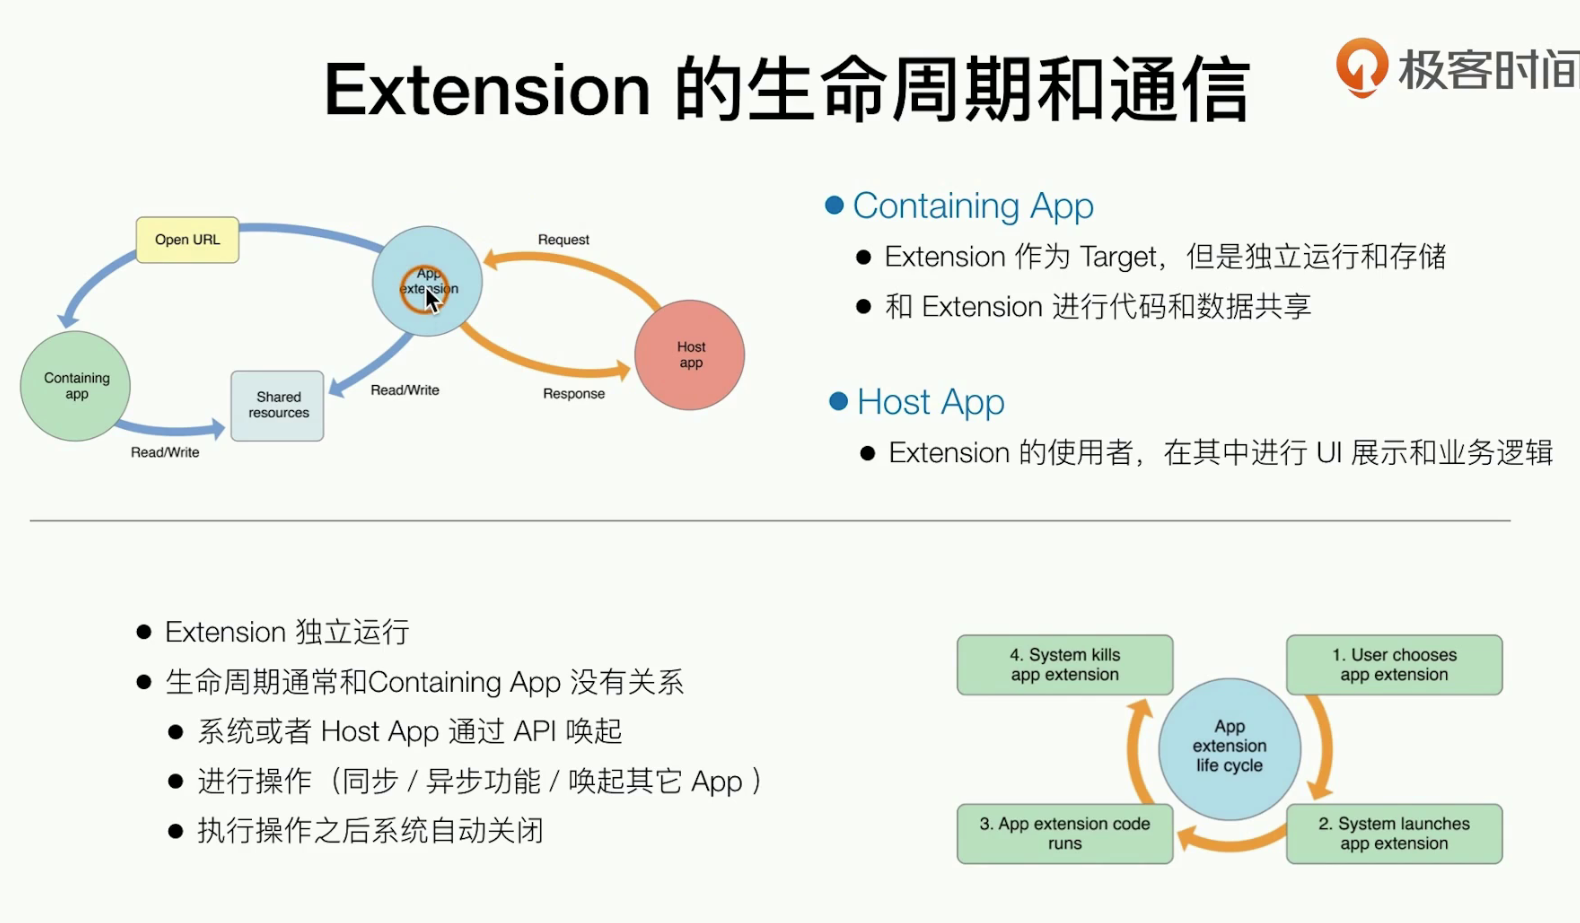
宿主App HostApp 调用Extesion ,由Extendsion 启动被唤醒,进行一些ContaiingApp的逻辑或者功能,功能用完之后好,系统会把它自动kill掉
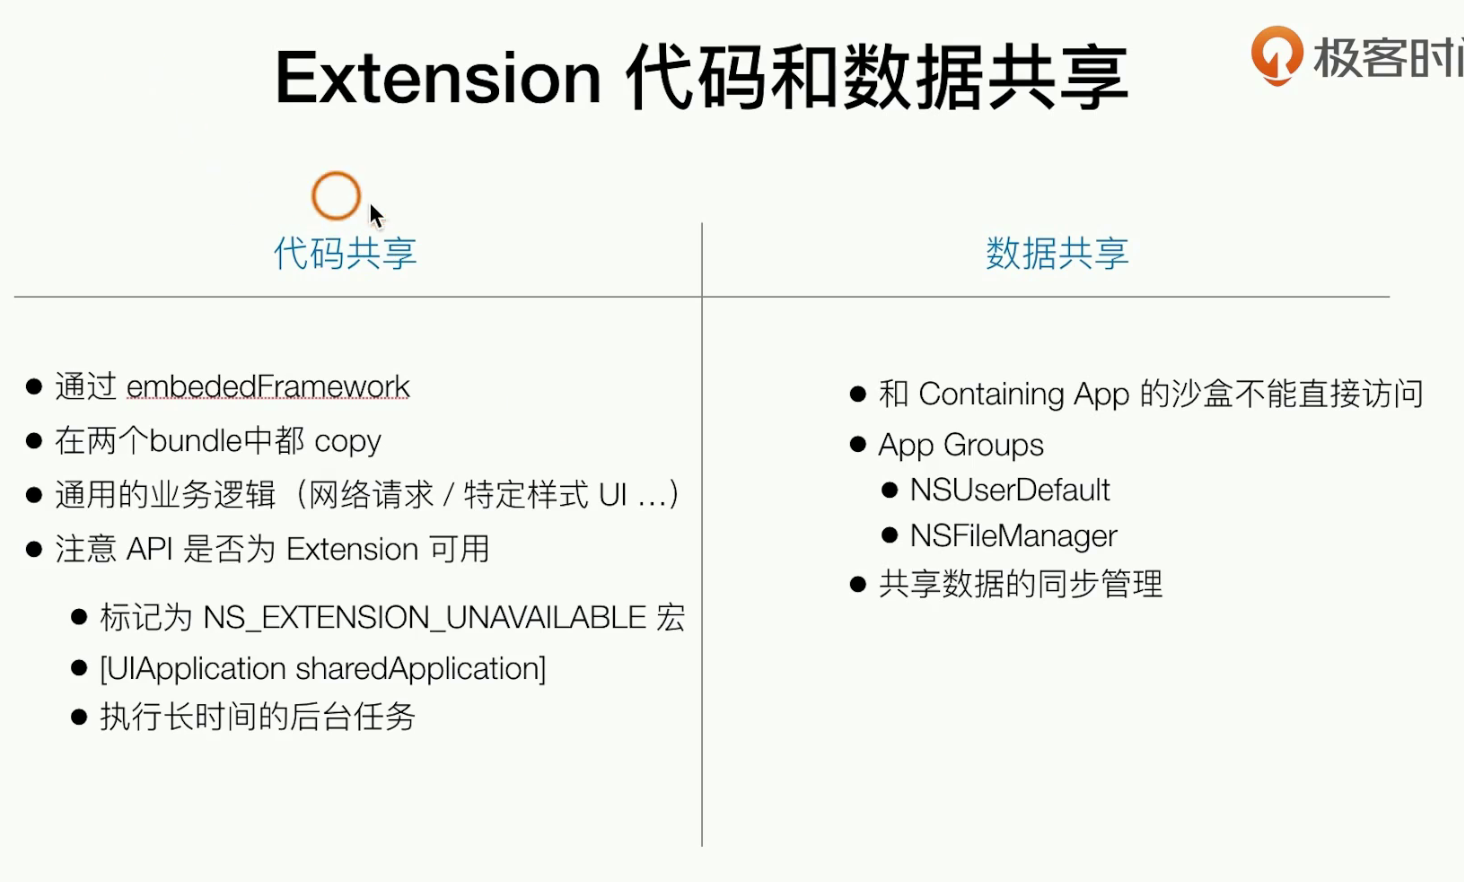
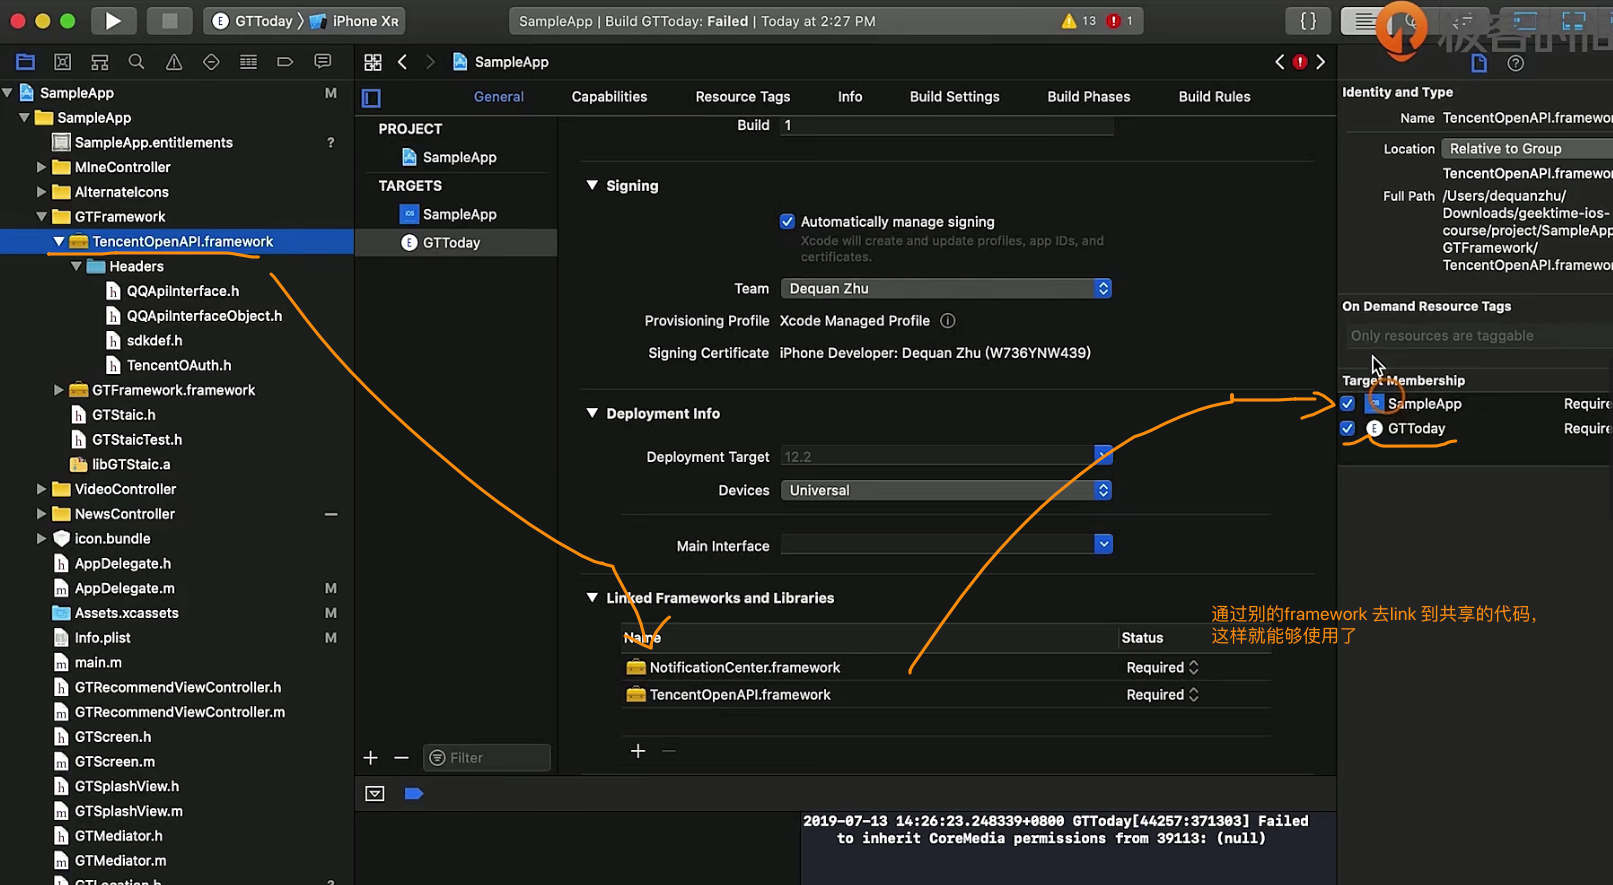
代码共享 ,就是通过embededFrmaewrok 进代码共享,extensoin时作为主App的功能衍生
实现一个代码和数据共享Extesion
先去创建一个
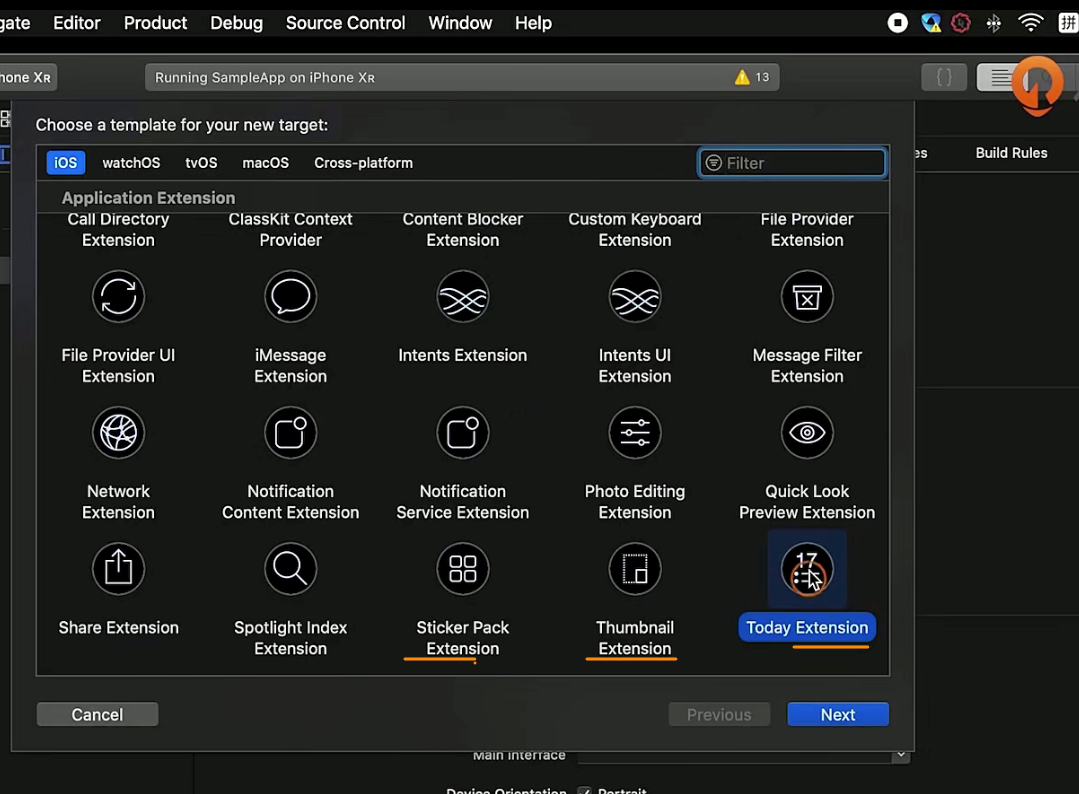
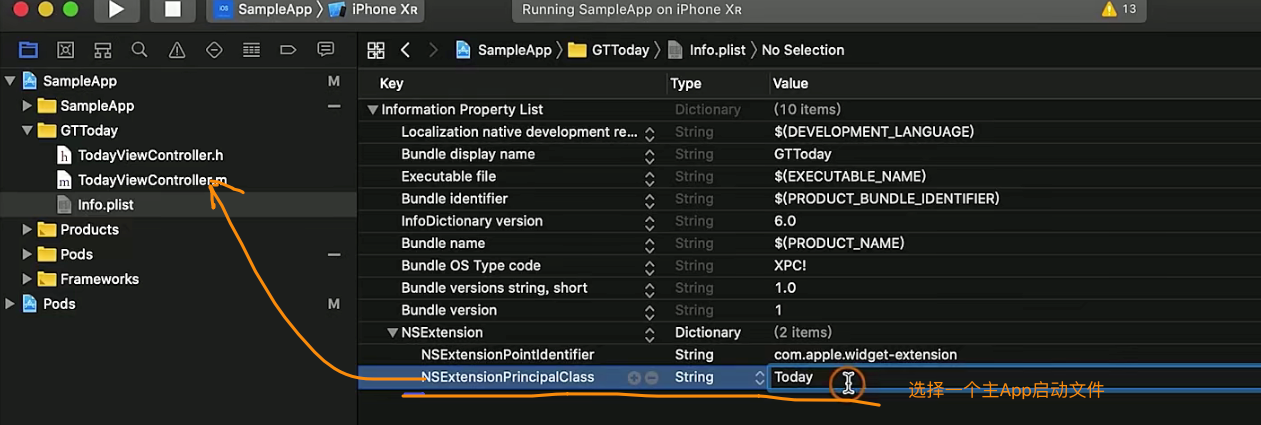
去实现具体业务逻辑的代码
//
//  TodayViewController.m
//  GTToday
//
//  Created by dequanzhu on 2019.
//  Copyright © 2019 dequanzhu. All rights reserved.
//

#import "TodayViewController.h"
#import <NotificationCenter/NotificationCenter.h>
#import <TencentOpenApi/QQApiInterface.h>  // 代码共享

@interface TodayViewController () <NCWidgetProviding>

@end

@implementation TodayViewController

- (void)viewDidLoad {
    [super viewDidLoad];

    [self.view addSubview:({
        UIButton *button = [[UIButton alloc] initWithFrame:CGRectMake(100, 0, 200, 100)];
        [button setTitle:@"点击跳转" forState:UIControlStateNormal];
        [button setTitleColor:[UIColor blackColor] forState:UIControlStateNormal];
        [button addTarget:self action:@selector(_openSampleApp) forControlEvents:UIControlEventTouchUpInside];
        button;
    })];

    //进行数据共享
    NSUserDefaults *userDeault = [[NSUserDefaults alloc] initWithSuiteName:@"group.com.dequanzhu.sample"];
//    [userDeault setObject:@"从0开发一款iOS App" forKey:@"title"];
    __unused NSString *shareTitle = [userDeault objectForKey:@"title"];

}

// 页面有更新的时候 会进入这个回调
- (void)widgetPerformUpdateWithCompletionHandler:(void (^)(NCUpdateResult))completionHandler {
    // Perform any setup necessary in order to update the view.

    // If an error is encountered, use NCUpdateResultFailed
    // If there's no update required, use NCUpdateResultNoData
    // If there's an update, use NCUpdateResultNewData

    completionHandler(NCUpdateResultNewData);
}

#pragma mark -

- (void)_openSampleApp{
    //跳转到主App
    [self.extensionContext openURL:[NSURL URLWithString:@"GTTest://"] completionHandler:^(BOOL success) {

    }];
}

@end


## .m
#import <UIKit/UIKit.h>

@interface TodayViewController : UIViewController

@end
如果需要同组的App数据共享,就需要去看搞一些证书相关的东西

在相同的gruop下,App的部分数据时可以共享的
   ++++
    //Extension 共享数据
    NSUserDefaults *userDeault = [[NSUserDefaults alloc] initWithSuiteName:@"group.com.dequanzhu.sample"];
    [userDeault setObject:@"从0开发一款iOS App" forKey:@"title"];

## 然后我们可以去 别的共享代码里取到这些数据
+++

@implementation TodayViewController

- (void)viewDidLoad {
    [super viewDidLoad];

    [self.view addSubview:({
        UIButton *button = [[UIButton alloc] initWithFrame:CGRectMake(100, 0, 200, 100)];
        [button setTitle:@"点击跳转" forState:UIControlStateNormal];
        [button setTitleColor:[UIColor blackColor] forState:UIControlStateNormal];
        [button addTarget:self action:@selector(_openSampleApp) forControlEvents:UIControlEventTouchUpInside];
        button;
    })];

    //进行数据共享
    NSUserDefaults *userDeault = [[NSUserDefaults alloc] initWithSuiteName:@"group.com.dequanzhu.sample"];
//    [userDeault setObject:@"从0开发一款iOS App" forKey:@"title"];
    __unused NSString *shareTitle = [userDeault objectForKey:@"title"];

}
UIKit中比较复杂的组件(用户输入&键盘)
基础知识
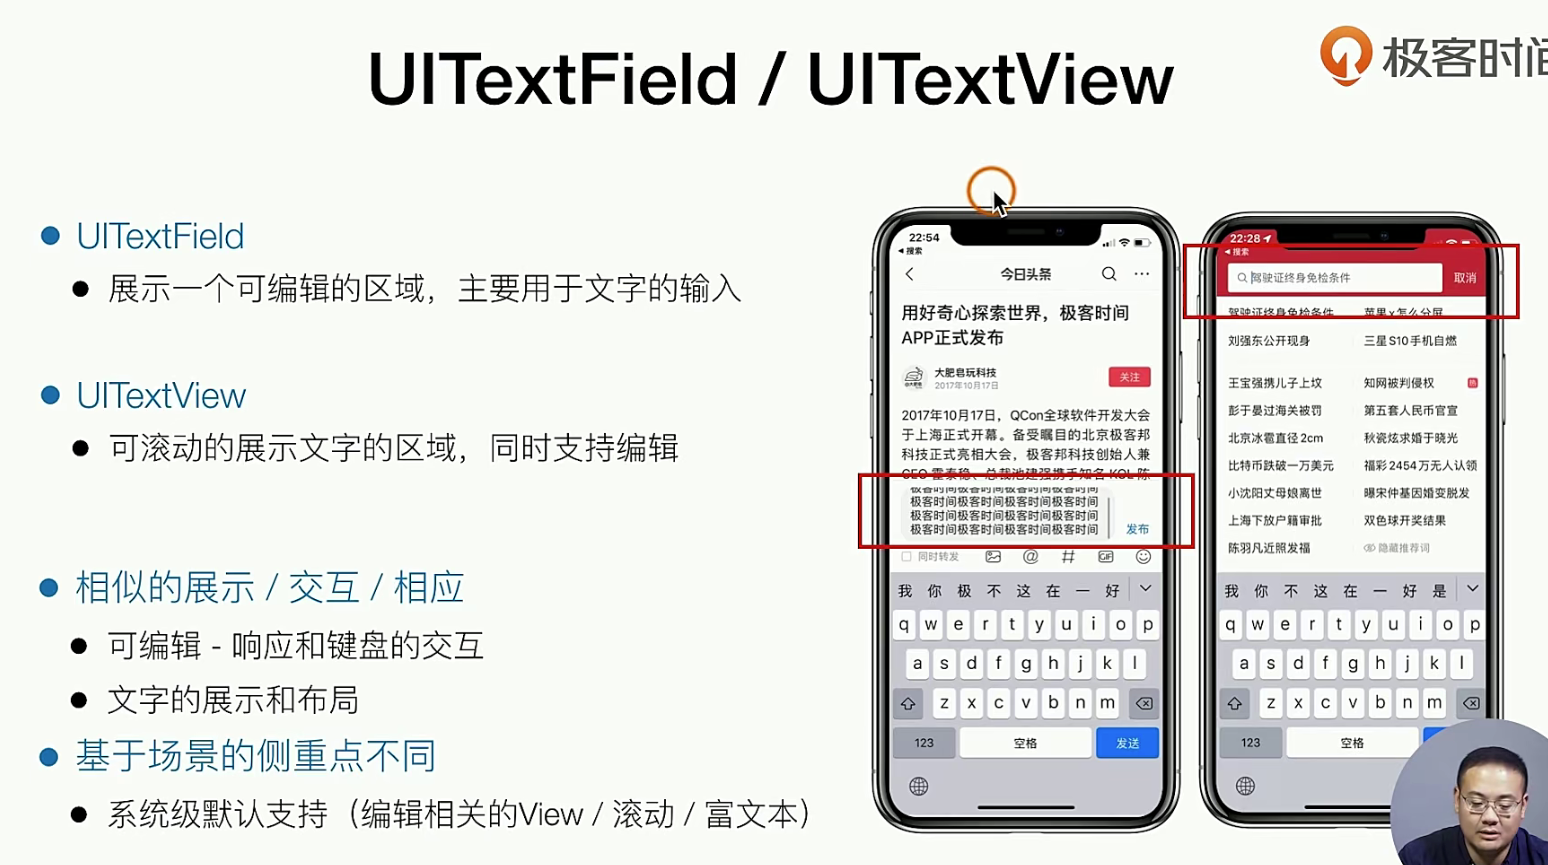
就拿RN 来说,RN的TextInput Mutilept 对这个支持就非常的完善。也不用这么复杂
对于和键盘的交互 ,RN 也有相关的解决方案,也比较的简单,
代码实现
总体来说,代码实现角度来说,也相对的比较简单
// GTSearchBar.m
#import "GTSearchBar.h"
#import "GTScreen.h"
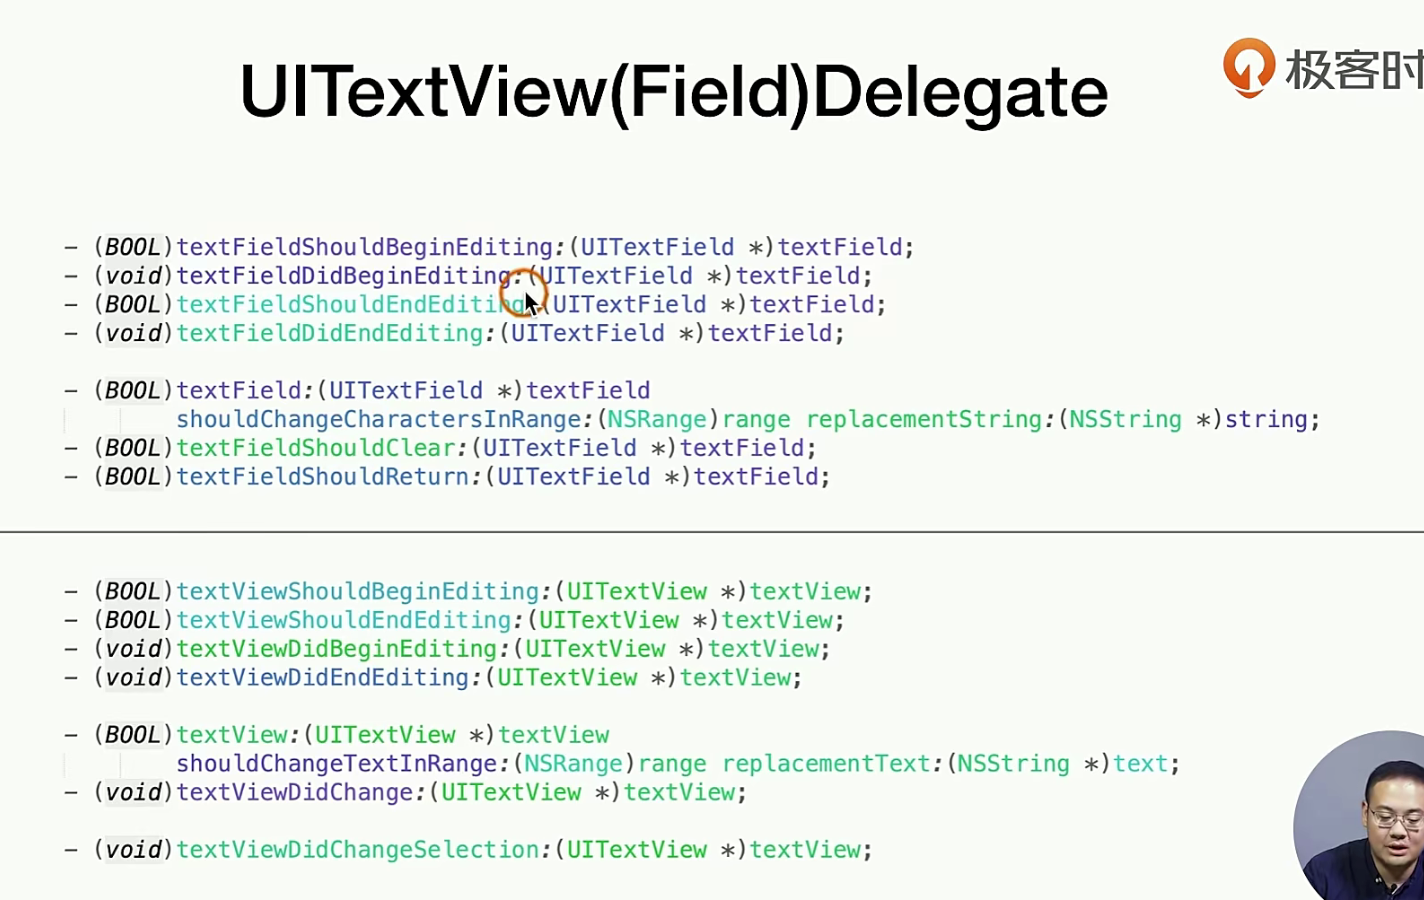
@interface GTSearchBar ()<UITextFieldDelegate>
@property(nonatomic, strong, readwrite) UITextField *textField;
@end
@implementation GTSearchBar
- (instancetype)initWithFrame:(CGRect)frame{
self = [super initWithFrame:frame];
if (self) {
[self addSubview:({
_textField = [[UITextField alloc] initWithFrame:CGRectMake(UI(10), UI(7), frame.size.width - UI(10) *2, frame.size.height - UI(7) *2)];
_textField.backgroundColor = [UIColor whiteColor];
_textField.delegate = self;
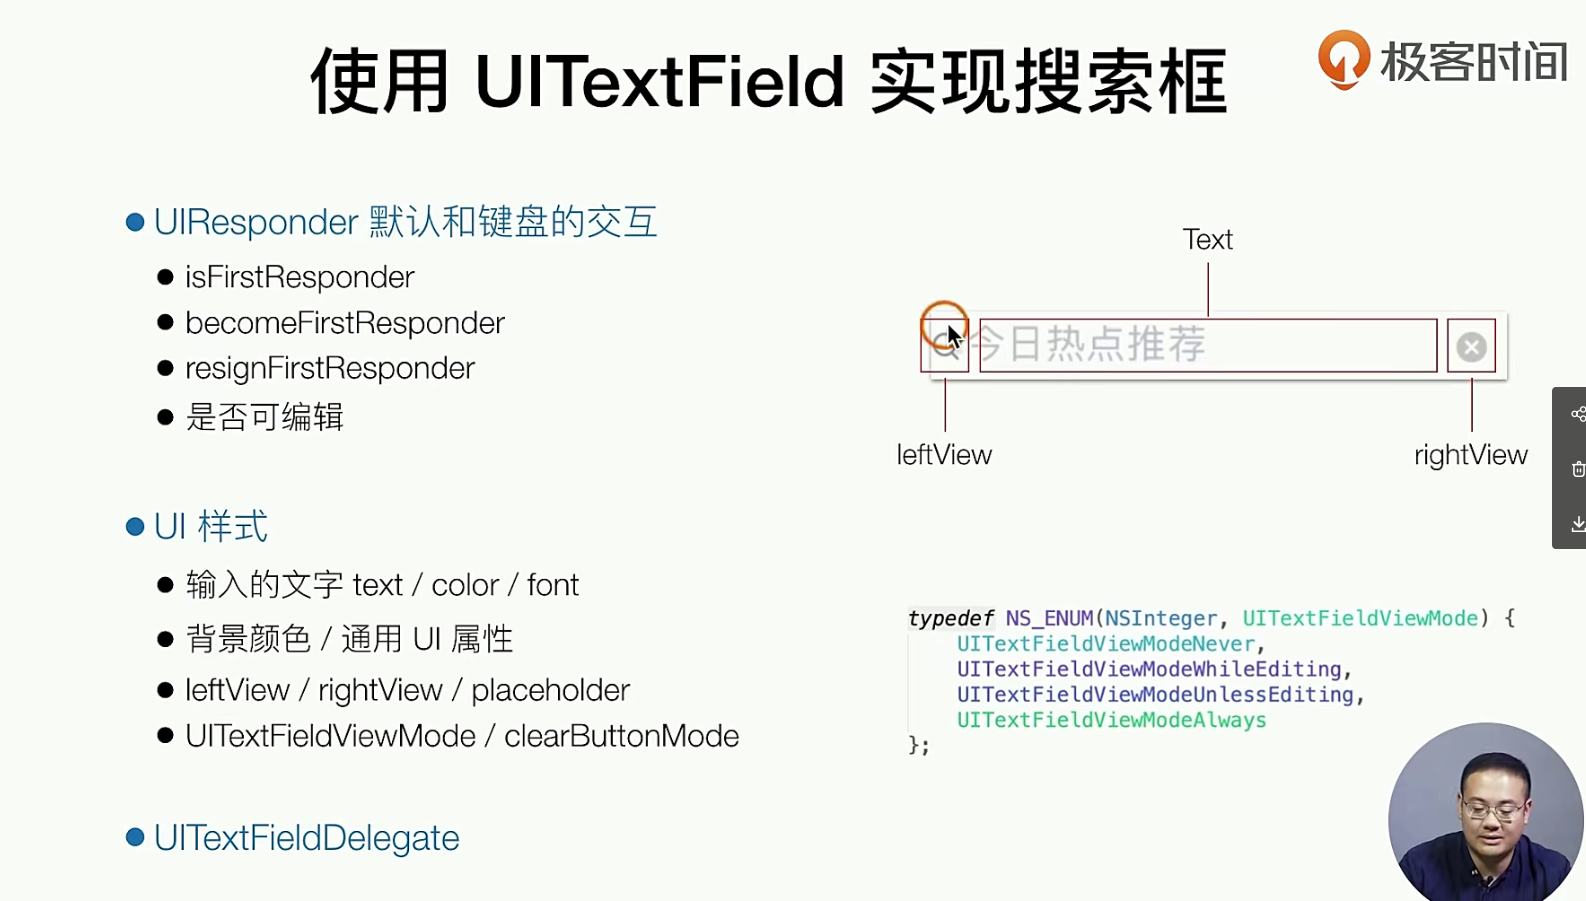
_textField.leftView = [[UIImageView alloc] initWithImage:[UIImage imageNamed:@"search"]];
_textField.leftViewMode = UITextFieldViewModeUnlessEditing;
_textField.clearButtonMode = UITextFieldViewModeAlways;
_textField.placeholder = @"今日热点推荐";
_textField;
})];
}
return self;
}
#pragma mark -
// 两个键盘实践 ⌨️
- (void)textFieldDidBeginEditing:(UITextField *)textField{
//
}
- (void)textFieldDidEndEditing:(UITextField *)textField{
//
}
- (BOOL)textField:(UITextField *)textField shouldChangeCharactersInRange:(NSRange)range replacementString:(NSString *)string{
//常用业务逻辑 - 字数判断 可以在此函数中实现
return YES;
}
- (BOOL)textFieldShouldReturn:(UITextField *)textField{
[_textField resignFirstResponder];
return YES;
}
@end
### .m 文件的实现
// GTSearchBar.h
#import <UIKit/UIKit.h>
NS_ASSUME_NONNULL_BEGIN
/**
搜索条
*/
@interface GTSearchBar : UIView
@end
NS_ASSUME_NONNULL_END
### 我们可以砸viewWillApperar的生命周期中贴到View中去
// GTNewsViewController.m
- (void)viewWillAppear:(BOOL)animated{
[super viewWillAppear:animated];
[self.tabBarController.navigationItem setTitleView:({
GTSearchBar *searchBar = [[GTSearchBar alloc] initWithFrame:CGRectMake(0, 0, SCREEN_WIDTH - UI(20), self.navigationController.navigationBar.bounds.size.height)];
searchBar;
//拉起键盘和输入框
// UIButton *button = [[UIButton alloc] initWithFrame:CGRectMake(0, 0, SCREEN_WIDTH - UI(20), self.navigationController.navigationBar.bounds.size.height)];
// button.backgroundColor = [UIColor lightGrayColor];
// [button addTarget:self action:@selector(_showCommentView) forControlEvents:UIControlEventTouchUpInside];
// button;
})];
}